Is it really may since I last posted!!!
Quick update on how things have been going. Had a successful run to Le Mans in June. Ran all the way there and back without a hitch....apart from the engine bay getting a bit warm in the Le Mans traffic. Less than a week later went for a run to a local pub and broke down on the way home...it started popping and banging on one cylinder, then cleared itself and was OK. Played up occassionally over the next few drives and eventually discovered one of the HT leads was on its last legs so replaced the whole ignition system from coil pack onwards.
Minor issue with the alternator bracket - the weld on it broke causing the alternator to move at an angle and the belt popped off three of its five grooves. Welded it up a bit more securely second time!
Still have a problem with a petrol smell under hard acceleration. This is fuel stand off and I believe can be cured with trumpets/stacks on the carbs to increase the venturi effect. Have made up some simple ones (Coke cans!) to experiment. Seems to have improved it slightly but need to be longer to have a better effect. But with the latest purchase that should become a thing of the past.
I have now acquired a set of GSXR thottle bodies, ST170 inlet manifold and a megaquirt ECU. To compliment these I will need a swirl pot (to ensure constant fuel supply) and a high pressure pump. I will also need to install the Robin Hood pedal set to move the master cylinder out of the way.
Monday, 17 August 2009
Wednesday, 13 May 2009
Fine tuning
Well since I have got back from Stoneleigh I have done a few jobs....after the frantic work the week before the show it was nice to have a rest.
The temp gauge has been sorted by fitting the 32mm adaptor from Rally Design. Only down point on this item was the fact there was no allowance for an earth, so I drilled a small hole and put a self tapper into it. Adaptor was fitted into the top hose with the Pinto temp sender. Run out the weekend showed the gauge sat nicely in the middle of its span.
Also dealt with the speedo. Drilled a 25mm hole just forward of the original one in the drivers side of the tunnel...once I had removed carpet, false floor, etc! I didn't build it to come apart..... Cable clipped back into gearbox and the speedo was working again. Just need to suss out the alternator light wiring to stop it being on all the time.
Next job is to refit the boot, tidy up the engine bay wiring and fit an expansion tank. Have also just received some 32mm silicone top hoses and a new windscreen washer bottle which will be fitted shortly.
Monday, 4 May 2009
Stoneleigh here I come.....
Saturday was a frantic days work to correct/finish all the interim jobs.
First off was the carbs. Now the TPS was wired correctly I centered my attentions on drilling out the jets to help the running. I went for 150 size (1.5mm) - standard is 95. Web research suggested most run at around 160 - 170 main jets, so I thought starting at 150 would give some leaway. (I subsequently learnt from Chris at Trigger Wheels if you over drill the jets you can fill them with solder and have another go!)
While I had them off I examined the de-icing system on the base of the carbs and realised it ws letting air into the carbs, so I blanked these off. I also connected the pipes which appeared to be for carb balancing (two carbs already joined, one blanked off, and one open) to seal off any other leaks.
Popping them back on the car an a quick test and it ran as sweet as a nut - pulled apart the balacing pipes and it chuffed air like a steam train!
Next job was connecting the engine sensors. First up was tacho. Straight into the back of the megajolt and straight away had a rev counter! The oil pressure switch was again straight forward (sensor under the carbs) as is just a single switch. The water temperature sensor is i the thermostat housing and has two wires. Looking at the wiring diagram it looked like one was earth and one sent the signal. I hooked this up and the temp guage started to move.
Next up was sorting the bonnet. I made a card template of the slot I was going to have to cut for the exhaust, then drew this onto masking tape on the side of the bonnet. I cut away about 80% of the template line to allow for final jiggling.
I then set the catch down to its original position, and with a couple of hours jiggling I had the bonnet shutting. I extended the exhaust clamp which clips into the bonnet catch, spaced out the bonnet strengther, and trimmed away a small amount of the central flange to clear the cam belt cover. Then bonnet sits about the same at the edges, but slightly higher in the middle than with the Pinto engine.
I then finished off a few odd jobs - torqued up the propshaft bolts, tidied up the gearbox mount, put the alternator belt back on properly - it had moved across the grooves on the idler pulley.
Whizzed out for a quick test run with no faults showing up, except the temp guage didn't move all the way up - not even reaching cold, so I chucked a bucket of water over it. Matt then turned up and we had a look at the temp guage problem. Came to light these later Zetec's had one sensor which talked to the ECU, then that spoke to the guage - therefore it was sending the wrong signal for the guage to work.
So the next day (Sunday) I was up early for our run to Stoneleigh. Key in the ignition...nothing. ARRRGHHHHH!!!!! Could not believe it. Battery must be flat. Whipped bonnet up, then decided to check battery voltage - 12.5v. Must be something else. Looked into the engine bay and noticed the lead had come off the battery. Whipped a nut off another starter, bingo.... Off we went.
Run to Stoneleigh was uneventful - i.e. no breakdowns - but had a whiff of oil mist in the cockpit. Re-routed the vent pipes for the way home (must fit a proper breather tank) and all was fine. Ordered a 32mm diameter temp guage unit which goes in the top hose and should accept the sender from the Pinto, so the guage should read fine.
Just all those little finishing jobs to do now!
Friday, 1 May 2009
It's alive...
Well had a big push this week and the zetec heart is alive!
Last night was a wiring frenzy, when a neighbour came round and hooked up the fuel pump and edis ignition unit. Amazingly the car fired straight away - a shock all round. We went on to do the Megajolt and that seemed to improve the running.
Some frantic activity bleeding the brakes, bolting up the exhaust, making a throttle cable, filling with coolant, finding leaks, refilling with coolant, cutting and fitting the bonnet and I went off to get it MOT'd. Problem was the tickover had gradually increased, and by the time I arrived at the MOT station it was ticking over at around 3 - 4000 rpm. There was no way I could get it through like that, so the MOT was rearranged for later in the day.
A quick investigation brought to light that the jubilee clip holding one of the carbs on was resting against the throttle linkage. This was quickly rectified and I returned later for the MOT. The CO reading was quite low as I have not drilled out the main jets yet, but at least it was a past.
Much above tickover the car was not running well. With the assistance of Matt from Apple County kits and a borrowed laptop we discovered the TPS had been wired back to front - the Megajolt thought it was at full throttle when closed, and was retarding the ignition accordingly! Doh. A quick swap round made it run better, but think it needs the jets drilling out for full effect.
Monday, 27 April 2009
The end is nigh
Again I apoloogise for the lack of posts....I did go away on holiday for a week!
Well I have good progress to report.
Engine is back in on fully welded mounts - made from 6mm steel. I orginally used tube to connect the engine plate to the base plate, but this caused problems with getting the nut onto the mount. I got a local fabrication company to weld these up for me.
The coolant pipes are now complete. I used the swaged ends off a spare metal pipe from the Mondeo to make a blank for the heater pipe and the spur which goes into the water pump pipe and acts as a bypass for before the thermostat opens.
The GBS manifold had to be modified on the final bend as it did not exit at the correct angle to allow the silencer to fit. It is all now fitted with the silencer mounted on a modified Pinto exhaust bracket (call it recycling!)
Whilst on holiday I purchased another set of carbs - this time from a Kwaka ZRX1100. These sit more vertical than the ZX6 carbs and I have made a manifold to fit - the second version infact as the first was slightly too long and the carbs touched the brake master cylinder.
I removed all the rear panels and I have made a bracket to mount the fuel pump under the boot floor. Just needs wiring up.
Once I got all the main bits back in tonight I decided just to see if the engine would at least turnover - and it did! All I need now is an ignition system!
Tuesday, 14 April 2009
Getting there
I know there has been a lack of posts recently, but I am at last getting somewhere.
I had the propshaft extended by propshaft services in Bradford. Highly recommended. www.propshaft.co.uk
Trimmed and neatened up the rear of the floor before putting the propshaft back in. Would not quite go through the hole I had created, so had to lower the front of the gearbox, thus raising the back, to enable it to go in.
To make new engine mounts I fabricated a jig using some chipboard. I bolted in the existing Sierra mount with the adaptor plates, then measured out to move the engine forward 62mm, and also to relocate the mounting hole to the original one in the chassis. I used 6mm plate to make a base plate, and some 42mm, 3mm wall tubing to connect it to the original adaptor plates to the base plates. I also raised the engine on the mounts to try and solve the clashing exhaust/side rail issue.
I bolted up the original thermostat housing to the engine, casting aside the DIY water rail I had spent so much time on..... Dropping the engine back in the new mounts were spot on, with a few mm's clearance for the thermstat housing. The engine now looks rather high at the front....a quick bit of measuring shows the flange in the centre of the bonnet will need trimming, and the bonnet stay system I have will need to be removed.

Worked my way round the ancilleries. The CVH Sierra starter motor has arrived and fits the hole/trimmed sump nicely, and as an added advantage the wiring connections are the same as the Pinto. The coil pack bolted to a modified original bracket at the back of the engine.

The new engine position also means the original oil filter will not fit, as it would clash with the sterring column. A quick bit of internet searching found the Unipart GFE210 filter is the one to go for.... (Alternatives are Crossland 659 or Fram PH 2874). Picked one up today and it is the size of a tine of tuna, rather than the Red Bull can sixe item that was there before. The new one is just 65mm deep.
Wiring wise I have been stripping out the connecters from the Mondeo loom for the various sensors, and the Edis4 unit is now mounted on the bulkhead, so next step is to wire up the various sensors to it. I have also sorted the majority of the coolant hoses. I used the original flexi hose at the top of the pinto engine to connect the water pump to the original radiator bottom hose with a short length of 32mm steel tube (will replace with alloy). The original top hose from the Mondeo thermostat has been cut and shut to get the outlet of it to aim fowards. Just need a 32mm 90 degree bend to put on the radiator top connection, and a length of 32mm steel tube will connect the tube.

That ends the good progress.....
The induction side is still a headache. The ZX6 carbs are downdraft type. This means fo rhte floats, etc to work correctly they need to be at around a 45 degree angle. The next issue is they are not as widely spaced as the Mondeo inlet ports. And finally the brake master cylinder is still in the way of them being too far away from the engine. In summary, they won't fit with the brakes where they are now. The angle they have to be at along with stetching the spacing from carb to engine makes the flow want to go thru a 90 degree angle, which is not good.
I had looked at a floor mounted brake pedal kit from OBP. This would be two master cylinders, with brake bias adjustment, etc. But by the time I had purchased reserviors, etc the total cost was going to be the thick end of £200.
Today I speaking to Richard at Robin Hood. He was very helpful, and have come to a resolution on the exhaust pipe. We went on to discuss the general engine swap over issues, and when talking about the brakes he said they had developed a clutch/brake pedal kit which turned the master cylinder round to face the other way, therefore getting it out of the way of the induction side of the engine. I am waiting for him to email me a price but this may well be the solution to some of my problems.
Monday, 30 March 2009
Well that's done it.....
Well after moping around over the weekend, I drew up my project plan and have decided to go for it.
I have found a company in Bradford (Propshaft services) which will extend the propshaft for £55 + vat. Sounded very helpful, and as I am travelling to Harrogate this week I can drop it off on the way, and pick up on the way back.
Anyway, got the zetec back out (again) and hoisted the back of the car up via the roll bar with the engine hoist.....and the car seemed to have a magnetic attraction to the wall....it was a bit sweaty and sweary for a few minutes.... Held the front of the gearbox up with rope to a cross bar whilst I released the back of the box, then moved the whole box forward.
Getting the prop out was a bit of a battle.....had to cut the floor at the rear of the car to allow the prop to come out....the rear flange is too bigger diameter to go down the tunnel, to had to make a clearance gap at the rear.... When I built the car you put the propshaft in before you put the panels on so not a problem at that stage.
So according to my plan I am nicely on schedule.....for now.
Sunday, 29 March 2009
Dark times in the workshop
Not gone well this weekend. Got the engine in with clutch fitted, etc. That was the high point. Offered up the Great British Sportscars exhaust and one tube of the manifold doesn't pass the chassis - hoisting the engine up it needs to be moved up nearly an inch to clear the chassis, but then the engine would be hitting the bonnet.... I experimented with spacers under the engine mounts to tilt the engine but it meant it was close to the bulkhead near to the brakes. I will be speaking to them tomorrow and will post the outcome.
So moved onto the inlet manifold. It was still very tight to the master cylinder, but thought I could get away with it. But once I had welded on the first tube it quickly became clear it wasn't going to happen.
I am quickly coming to the conclusion a lot of problems will be solved if I move the engine forward by about 60mm. This will mean a space at the back of the head for the original thermostat, and the inlet manifold will be able to have a straight run. This will of course have an impact on the drivetrain - longer propshaft, gearlever extension, etc....
Problem is Stoneleigh is only 5 weeks away.....and I really want to take the car....
I have started drawing up a proper project plan.....if I could stick to it would be completed just after Easter.
Sunday, 22 March 2009
Beyond the point of no return.
Not much visual progress this weekend as it was various odd bits and pieces I was up to.
I picked up the brake pushrod from Tigers last week. Jim Dudley was very helpful giving advice on it. I disconnected the brake pipes ffrom the master cylinder and then drained out the brake fluid from it. Off with the master cylinder and then the servo, then back on with the master cylinder with the new pushrod to activate it. All seems to fit OK, and the two brake pipes for the front brake needed only a little bending to fit the master cylinder in its new position. The brake line to the rear brakes was a different story.... I needed to get it away from the back of the engine, and also as far away from the carb area as possible, and this took a lot of origami style bending. As its now been knocked around a bit I will see if I can replace it before I complete the engine swap.
I have also tidied up the wiring on the bulkhead, moving it up and away from the engine. Finally I have been removing all the wiring I don't need and also re routing the alternator wiring as it is on the opposite side to where it was on the pinto. Luckily the wiring for it goes down the nearside, across behind the radiator to the alternator, so to get it to the nearside was just a case of unravelling it from the various clips.
Next task is to join the dot between the Mondeo loom and the Sierra one..... oh 'eck!
Saturday, 14 March 2009
Getting to the clutch of the matter.....
Another Saturday and another few jobs out the way.
Ground back the rest of the sump to allow clearance for the starter motor. Unfortunately I noticed that the Pinto starter motor will not fit easily..... the ring gear on the Zetec is closer to the engine than on the Pinto, meaning the motor gear will be in constant mesh with the ring gear...not good. Two options....a 14mm spacer puts the motor far enough out to work properly, or a starter from a CVH Sierra.... a Lucas LRS707 apparantly. The spacer sounds like a temporary fix whilst I am on the look out for a CVH starter.
 I moved on to finishing the engine mounts properly. To make them easier to fit I welded nuts on to the back where the original mounts bolt on....means I can leave the adaptor plates in place and just add the mounts. Also cut the off side one down to a sensible size.


Ground back the rest of the sump to allow clearance for the starter motor. Unfortunately I noticed that the Pinto starter motor will not fit easily..... the ring gear on the Zetec is closer to the engine than on the Pinto, meaning the motor gear will be in constant mesh with the ring gear...not good. Two options....a 14mm spacer puts the motor far enough out to work properly, or a starter from a CVH Sierra.... a Lucas LRS707 apparantly. The spacer sounds like a temporary fix whilst I am on the look out for a CVH starter.
I moved on to finishing the engine mounts properly. To make them easier to fit I welded nuts on to the back where the original mounts bolt on....means I can leave the adaptor plates in place and just add the mounts. Also cut the off side one down to a sensible size.
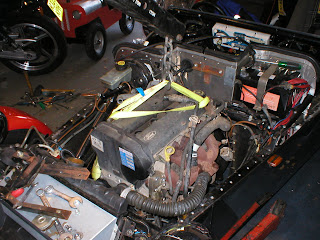
As the alternator bracket was made from a scrap of 6mm plate, I decided to weld the part the alternator mounts on to a new piece of steel. All was going well until I welded it on back to front...doh! A quick mod of the mount got over the problem, but for some reason the alternator now does not appear to be perfectly in line. The belt takes up the difference, but still annoying.
Alternator bracket from below....
I then moved on to finishing off the water rail....made a bracket with for the top bolt to go through, and also did a static water test on it and found a couple of leaks.
Finally, I put on the clutch. First I had to insert the small bearing which takes up the difference between the input shaft of the gearbox and the centre of the flywheel.
It was a bit reluctant to go in, and I may need to put it in further than it is, but will test fit it to the box first. After that I put on the clutch - Pinto friction plate with Zetec pressure plate.
Monday, 9 March 2009
Belts & braces.
Had quite a productive weekend overall. Made a bracket to hold the idler gear which makes the waterpump run the correct way. Used a collection of pulley parts off the Mondeo, and it worked out well.
Top idler pulley & bracket....

Uses old power steering bracket to mount off.
I used the original belt to measure the length of belt I required - the last four digits of the belt number tell how long it is in mm. I needed one between 1150 and 1205mm which was the full range of the alternator adjustment. A visit to the local autofactors today came up with a 1150mm belt which fitted rather well.

Other job I got on with last night was cutting the ally sump away to allow the starter motor to fit. There was alloy dust everywhere....as it doesn't spark I decided to do it in the garage to keep the neighbourhood noise level down. I have probably cut away 85% of what I need to, and I am able to offer up the starter motor in almost its correct position to see what to trim away.
The missing Edis unit arrived from Trigger Wheels today, and I have also landed a set of ZX6R carbs for £35, pump and connectors for £32, clutch release bearing £12. Last big bill will hopefully be the exhaust (£220 ish).
Pictures soon......
Sunday, 8 March 2009
Alternating problems
Things are progresssing despite the lack of posts.
I have completed the water rail unit. Now just need to test it to check it is water tight. It ended up slightly different from the design myself & Bling came up with to make the manufacturing of it easier.


Moved on to the alternator mount. Made one up in the same style of one I had seen on the 'net. Unfortunately the one on the net did not use original Sierra engine mounts (doh!), and the two mounts were fighting for the same space. As moving the engine mount would cause bigger problems, I modified my alternator bracket to mount below the holes in the sump where the bracket bolts on, and this allowed the alternator to sit a lot tighter to the engine. As a bonus there is a threaded hole in the block which takes the adjuster bracket off the Pinto engine and the alternator was on and adjustable. The angle of the adjuster looks a bit odd but does seem to function OK.
Friday, 27 February 2009
Thermostat/Ignition pack
I have a inlet manifold blank on order (£24 delivered) so can hopefully start looking at the inlet side shortly.
Last night spent an evening in the garage with Mr Bling measuring up for the water rail & thermostat housing. Eventual plan appears to bring the water round to the side of the head where I will then use the Pinto thermostat and housing, with the outlet facing forward to hook up to the existing hoses. Hopefully.
Also offered up the coil pack. Once removed from its original pressed steel mounting bracket, it will sit nicely on the side of the pedal box on the bulkhead, which keeps it out of the way of the water rail above and the oil filler point.
This weekend hope to make the alternator bracket and the water rail unit.
Monday, 23 February 2009
Engine in!!
Well went back out tonight to do battle with the stud which was causing my problems....

Thankfully with some nimble finger work I managed to remove it without removing the engine. So I started to try and bolt up the offside mount. But as I tried to pull the engine across, there was something causing resistance. If ou look at the top of the pic above there is a plug to a sensor, and it was butting up to the firewall. So I removed it and the mount bolted up. 
I then moved on to the nearside, but that mount would not go in as easily, as it slots round the oil dipstick tube - need to put that mount in first when the engine has more swing movement. After a short battle I got it to fit, and I was able to remove the hoist.

A quick check underneath showed I have around 3.5" of ground clearance

Which in real terms is probably not enough.....but will do for getting things up and running.
Thankfully with some nimble finger work I managed to remove it without removing the engine. So I started to try and bolt up the offside mount. But as I tried to pull the engine across, there was something causing resistance. If ou look at the top of the pic above there is a plug to a sensor, and it was butting up to the firewall. So I removed it and the mount bolted up.
I then moved on to the nearside, but that mount would not go in as easily, as it slots round the oil dipstick tube - need to put that mount in first when the engine has more swing movement. After a short battle I got it to fit, and I was able to remove the hoist.
A quick check underneath showed I have around 3.5" of ground clearance
I did some quick offering up of the Mondeo alternator and mounts, which I need to swap to the other side from original. I was hoping to use the original spring loaded adjuster, but it is too bulky, and so is the alternator mount, so I will be fabricating those next.
Engine in....almost...
Some good progress again over the weekend. Purchased some 6mm steel plate from a local fabricators for £12 + VAT to make mount adaptors. First event of the weekend was managing to set light to my overalls whilst cutting the plate up! Thought my leg was getting warm, then I noticed the flames....


Inlet side was quite straightforward, but I could of done with starting the holes a bit higher in the plate, as it would of covered the whole of where the mount attaches to the plate. But with some trimming of the top of the mount it looks like it will be fine.
The nearside mount was more of a challenge. Originally I was going to use two bolt holes in the engine and two in the sump, as there is a lump of metal that sticks out of the engine restricting using the two holes further forward. But on closer inspection I realised these were likely to mean the mount & plate would get in the way of the started motor, so I took the bull by the horns and cut the metal lump off, and cut a new piece of metal to fit the new bolt locations. The piece was cut off from just to the left of the two studded holes, just below where the dipstick goes into the crankcase
I also had to trim a little of the crankcase vent mount to allow the plate to sit flat, and it needs 8mm thick spacers to bring the front holes in line with the back two. Also the holes were quite badly rusted so I had to get the tap and die set out to clean them out.
Anyway....measured up the changes to the location of where the mount rests on the mounting rubber unit compared to the Pinto, and redrilled the holes in the chassis to suit - slightly forward and further out compared to the original holes. Whilst drilling I noticed the original holes set the engine slightly to the nearside of the car - I think this is to allow for a wider drivers footwell.
So all holes drilled, I lowered the engine into the engine bay, bolted it up to the gearbox, then discovered there was a stud left at the back of the head.....which rested against the chassis preventing the engine moving across onto its mounts. And the stud would only come out if I removed the engine..... So at that point I threw in the towel and decided to have another go another day!
Thursday, 19 February 2009
Mounting trouble....
Mr Bling came round to assist tonight..... We removed the thermostat housing and the engine slotted up to the gearbox nicely, leaving about a 35mm gap to the chassis to put in some form of water rail.
We then started on the engine mounts. This is where old school Bling was trying to get me to just lob the engine in and see where it landed.....and I had my slide rule out. Once the dust had settled in that battle, it appears we can do the plan whereby an adaptor plate is made from 5mm steel to connect the Pinto mounts to the Zetec engine.
I will need to redrill the holes in the chassis for the rubber part of the mounts, but overall it should work fine. I have tomorrow off work so hopefully will get a chance to have a go at making the plates.
Monday, 16 February 2009
Serious progress at last....
Well I have really got stuck in over the weekend.


Old pinto engine out....
And offered up the Zetec in position..... OK, its still hanging from the hoist but fits the hole. In fact is 1.5" shorter in length than the Pinto so goes in quite easy.
Immediate problems....well my original idea of moving the gearbox (and therefore) engine forward to allow the original thermostat housing to fit is a no goer. I thought I could get away with moving it forward by just 15mm or so....it would need to move forward about 50mm, (the current gap between engine & gearbox with 'stat whacking the chassis) so I am going to have to replace the thermostat housing.
Sump appears to fit OK, but looks a little low, but I think it is all sitting low in the chassis at the moment, so hopefully I can lift it up on the mounts.
My initial idea with the mounts is to use 5 or 6mm plate to make adaptors from the Zetec engine to the original Sierra mounts. The rubber mounts on the chassis can be moved out so this is a possible goer and would make life a lot easier.
Have also brought a Megajolt ignition system (£180), as I will be running on carbs to start with.
Todays top safety tip....dont buy cheap spanners.....
Monday, 9 February 2009
Out with the old
Started stripping out the Pinto engine yesterday. Quickly became obvious running a tape measure over the Zetec that the orginal ford induction system ain't gonna fit.....well it might if I remove the steering column and move the pedals/bulkhead..... Probably going to have a phase 1 & 2 set up....start with Megajolt ignition and bike carbs, and phase two in the future move to throttle bodies injection.
Bonnet stored in roof...

Going to chip away at the pinto engine this week so can offer up the Zetec at the weekend.
Tuesday, 3 February 2009
Mondeo RIP
Just to let everyone know things are progressing, albeit slowly. The remains of the Mondeo were craned off to the great scrapyard and luckily went for free....apparantly the scrap price falls again in February so people will have to pay to have cars taken away again.
Internet research has solved most of the problem I have envisaged so far, but I am sure there are loads more lurking. Plan is to have the old Pinto engine out this weekend and the first test fit of the Zetec.
Internet research has solved most of the problem I have envisaged so far, but I am sure there are loads more lurking. Plan is to have the old Pinto engine out this weekend and the first test fit of the Zetec.
Monday, 19 January 2009
Engine out
Bit like a fisherman I have caught a 'big one'. Hauled the engine & box out of the Mondeo during the Saturday afternoon gale. Was getting a bit exciting at one point as I tried to control the flapping bonnet (I know, should have taken it off) whilst trying to haul out the engine. Next step is to seperate engine and box and get rid of the shell of the Mondeo, then I can really start getting one with it.
One bit of good news is I sold a couple of pieces off the Mondeo and got another £32....currently I have a better than free engine. All I have to do now is fit it!
One bit of good news is I sold a couple of pieces off the Mondeo and got another £32....currently I have a better than free engine. All I have to do now is fit it!
Sunday, 11 January 2009
Getting there....
Well, did have some good news.....sold a whole lot of spares + the wheels to a guy at work.....and recovered a big chunk of my outlay so the engine is now quite cheap.
On the downside it is becoming more hassle than probably worth getting a whole car just to take the engine from...should have just got an engine on its own. Regardless, I have removed a lot of ancillaries, drained down the coolant, etc, so hopefully either one night this week or next weekend will see the Zetec lump released from the engine bay.
On the downside it is becoming more hassle than probably worth getting a whole car just to take the engine from...should have just got an engine on its own. Regardless, I have removed a lot of ancillaries, drained down the coolant, etc, so hopefully either one night this week or next weekend will see the Zetec lump released from the engine bay.
Sunday, 4 January 2009
Free petrol!
Well started on dismantling the Mondeo yesterday, despite the negative temperature. Removed most of the front end lights/grill/etc ready for resale, and also drained most of the fuel out of it - nearly 50 litres!!! So that is about £40 credit to the running total! Rigged up an ingenious (well I thought so) system to pump it out via the fuel rail straight into a can. Also noticed the aircon pipes run across the gearbox so will either have to work round it when I lift out the engine or there may be a small hole in the ozone above my house......
Good run out today with the Apple County Kits guys - despite having to take a 15 mile diversion to get to the pub despite being only a mile from it! Roads were slippery and I was terrifying myself and other road users with locking wheels as soon as I touched the brake - the servo assistance was giving a bit too much power. Have done some internet research and find I can fit the master cylinder direct to the pedal which will solve the above problem and also assist with clearance for the induction system.
Good run out today with the Apple County Kits guys - despite having to take a 15 mile diversion to get to the pub despite being only a mile from it! Roads were slippery and I was terrifying myself and other road users with locking wheels as soon as I touched the brake - the servo assistance was giving a bit too much power. Have done some internet research and find I can fit the master cylinder direct to the pedal which will solve the above problem and also assist with clearance for the induction system.
Friday, 2 January 2009
Change of direction
Happy new year to all.
Well, plan A to use the original Ford ECU appears to have been shelved. Looking at the massive number of inputs/outputs to the ECU means there is going to be a big risk the engine will not run correctly once in the 2B. A bit of internet research has thrown up the Megasquirt ECU which can be brought for about £300 fully built and tested, and is mappable via a laptop.
Subject to anymore change in plans the Mondeo should be stripped out this weekend. Hopefully!
Subscribe to:
Posts (Atom)