Friday, 27 February 2009
Thermostat/Ignition pack
Last night spent an evening in the garage with Mr Bling measuring up for the water rail & thermostat housing. Eventual plan appears to bring the water round to the side of the head where I will then use the Pinto thermostat and housing, with the outlet facing forward to hook up to the existing hoses. Hopefully.
Also offered up the coil pack. Once removed from its original pressed steel mounting bracket, it will sit nicely on the side of the pedal box on the bulkhead, which keeps it out of the way of the water rail above and the oil filler point.
This weekend hope to make the alternator bracket and the water rail unit.
Monday, 23 February 2009
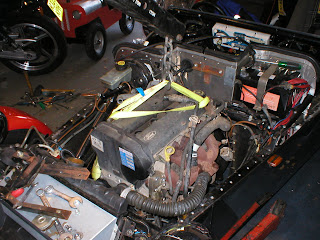
Engine in!!

Thankfully with some nimble finger work I managed to remove it without removing the engine. So I started to try and bolt up the offside mount. But as I tried to pull the engine across, there was something causing resistance. If ou look at the top of the pic above there is a plug to a sensor, and it was butting up to the firewall. So I removed it and the mount bolted up.

I then moved on to the nearside, but that mount would not go in as easily, as it slots round the oil dipstick tube - need to put that mount in first when the engine has more swing movement. After a short battle I got it to fit, and I was able to remove the hoist.

A quick check underneath showed I have around 3.5" of ground clearance

Engine in....almost...
Inlet side was quite straightforward, but I could of done with starting the holes a bit higher in the plate, as it would of covered the whole of where the mount attaches to the plate. But with some trimming of the top of the mount it looks like it will be fine.
The nearside mount was more of a challenge. Originally I was going to use two bolt holes in the engine and two in the sump, as there is a lump of metal that sticks out of the engine restricting using the two holes further forward. But on closer inspection I realised these were likely to mean the mount & plate would get in the way of the started motor, so I took the bull by the horns and cut the metal lump off, and cut a new piece of metal to fit the new bolt locations. The piece was cut off from just to the left of the two studded holes, just below where the dipstick goes into the crankcase

I also had to trim a little of the crankcase vent mount to allow the plate to sit flat, and it needs 8mm thick spacers to bring the front holes in line with the back two. Also the holes were quite badly rusted so I had to get the tap and die set out to clean them out.
Anyway....measured up the changes to the location of where the mount rests on the mounting rubber unit compared to the Pinto, and redrilled the holes in the chassis to suit - slightly forward and further out compared to the original holes. Whilst drilling I noticed the original holes set the engine slightly to the nearside of the car - I think this is to allow for a wider drivers footwell.
So all holes drilled, I lowered the engine into the engine bay, bolted it up to the gearbox, then discovered there was a stud left at the back of the head.....which rested against the chassis preventing the engine moving across onto its mounts. And the stud would only come out if I removed the engine..... So at that point I threw in the towel and decided to have another go another day!
Thursday, 19 February 2009
Mounting trouble....
We then started on the engine mounts. This is where old school Bling was trying to get me to just lob the engine in and see where it landed.....and I had my slide rule out. Once the dust had settled in that battle, it appears we can do the plan whereby an adaptor plate is made from 5mm steel to connect the Pinto mounts to the Zetec engine.
I will need to redrill the holes in the chassis for the rubber part of the mounts, but overall it should work fine. I have tomorrow off work so hopefully will get a chance to have a go at making the plates.
Monday, 16 February 2009
Serious progress at last....


Monday, 9 February 2009
Out with the old

Going to chip away at the pinto engine this week so can offer up the Zetec at the weekend.
Tuesday, 3 February 2009
Mondeo RIP
Internet research has solved most of the problem I have envisaged so far, but I am sure there are loads more lurking. Plan is to have the old Pinto engine out this weekend and the first test fit of the Zetec.
