Saturday, 26 February 2011

Progress at last - coolant hoses and brakes

Well headed out to the garage with a job list this weekend. Did have a bit of a fiddle around last weekend, but did not really achieve anything significant. Main job was grinding away a little of the cross member so the radiator would lay a little flatter, and making up the front brackets for the radiator

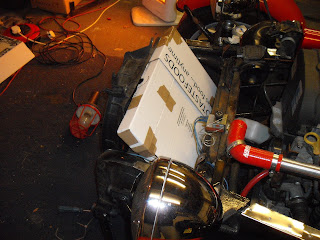
First task was sorting out the radiator hoses and connections. I had got a 45 degree bend to connect to the top of the radiator which needed trimming to keep the overall height down. Looks like it will fit OK under the nose cone, but will need to do a quick check at some point. I then tidied up the relief hose connection from the thermostat unit and made a bracket to support it. Can be seen here through the exhaust.


I then modified the old coolant tube from the previous radiator install to add an additional inle to take the return from the header tank. I used the bend I had cut off the above tube as it already had a swaged end.


I have fitted it using a cut off 45 degree rubber hose and an old 90 degree silcone hose - the bend is tighter than 90 degrees so have ordered a 135 degree bend. The original hose I was going to use for this I discovered was narrower in the middle of its run compared to the ends, so would not fit onto the 32mm tube. Grrrr. You can see one connection has been made to the return unit, the other to be sorted once the location of the header tank is sorted out.

Finally, decided to have another look at the brakes. All the options I have come up with for forward mounted master cylinders still get in the way of any inlet system. So I decided to have another look at the Zero brake system. With a bit of adjustement of the angle of the master cylinder mounting plate I THINK I can create enough clearance to the steering column. I have cut a base plate for it using the original mounting holes for the previous pedal set up, and clamped the new unit to it.


Tomorrow I am going to cut the master cylinder mounting bracket off and tack weld it back on at a slight angle. Hopefully this will lift the master cylinder just far enough away from the column so I can get the brake pipes connected.

Sunday, 13 February 2011

Going backwards

Why can't people manufacture stuff correctly? After the farce of the pedal box, it now appears the plenum is also a pup. The injector holes are too small and also badly aligned so the injectors will not go in, the angle it puts the fuel rail at makes it contact the rocker cover, and the plate for the throttle body is distorted so can't seal it very easy. A quick internet search showed I was not the first to run into problems with this unit. I have emailed the supplier requesting a refund so will see how I get on.

So what did I achieve today. I removed the old expansion tank, repositioned the horn, and sorted the throttle body bracket so it did not hit the bonnet, but that may now be a waste of time as I will have to sort some other inlet system. Grrrrrr.

Saturday, 5 February 2011

Radiator Part 2


So with the test piece suggesting it would fit, I ordered a new Polo radiator from Fleabay.

On initial offering up of the rad suggested it should be OK. A friend Matt popped round to help fit it today, and kept me focussed when I could easily have given up.

The main problems were a) keeping the rad clear of the steering column and b) when doing that not preventing the bottom hose connection of the rad being blocked by a chassis cross member.

The first bracket arrangment we came up with was sturdy but set the radiator too high and would have prevented the nose cone being fitted. We went through various set ups but eventually settled on one which used flat plate and a couple of angle brackets as the main support, and will add some upper brackets to make it firmer. I will be able to vent the majority of the air out of the top of the nose cone, so should reduce a fair bit of engine bay temperature.

Radiator Part 1

The Air Flow meter once mounted on the throttle body with a 90 degree bend was coming into contact with the top of the radiator. I had wanted to get the radiator tilting forward so I could vent it out of the top of the nosecone to reduce engine bay temperature.


So I stripped the front end out to have a fresh start at the radiator set up. The original one had always been a compromise of Robin Hood supplied parts.

So this is before (less the cooling fan that was in front)


And this is stripped out.....


So I made up a cardboard template of a VW Polo radiator and used it to see if it would fit.

More problems, a few solutions.

Sorry for the lack of updates, no excuses......

Its being a nightmare. This is the sort of period during a full build where cars end up as 'unfinished projects' on ebay. So what particular walls have I run into?

Brake Pedal Conversion

Once I got the Zero brake kit aligned it became obvious the brake lines would collide with the steering column and its mounting bracket.


This is the unti without the master cylinder attached. A possible solution is to use a shorter master cylinder which may give more clearance.

Another alternative I am looking at is to move the old pedal mounting plate back to either create space for a very shor master cylinder (such as Fiat Punto) or to have a cross bar move the master cylinder across to miss the new plenum.

Injectors/fuel rail.

Lined up the fuel rail and injectors on the new plenum chamber. Initial problem is the fuel rail comes into contact with the rocker cover, especially the vent tube from it. Due to the design of the chamber it angles the injectors backwards. I have looked at fuel rails off later Mondeo's but believe these are from Duratec engines rather than Zetec so unlikely to fit. Going to email the seller (Pepper Performance) for advice.

Radiator

See next post.....

Sunday, 30 January 2011

More bits coming off

Not been a good day in the workshop......

Having discovered last week the new pedal set won't fit have had to come up with alternative solutions, then to add to it the inlet system wont fit without having to move the radiator.

Will update more later in the day......grrrrrrrrr

Monday, 17 January 2011

Parts ordered

Well got onto ebay today and ordered a pump, swirl pot and 12mm fuel pipe. Hopefully should have most stuff to put the injection side loosely together over the forthcoming weekend.

Have made a deal with myself that if I complete the pedals and injection by the end of February, I will do the bulkhead/scuttle conversion.

Sunday, 16 January 2011

Pedalling to no where

Well managed to finish stripping out the pedals and half of the bulkhead.

Starting to ferment ideas of replacing the whole bulkhead and rear of the bonnet with a GRP scuttle unit. The bulkhead arrangement was always a bit of a compromise, making access to fusebox, etc a nightmare. Proper scuttle unit with flip forward bonnet would be good.....the bonnet catch at the front of the bonnet would go giving space for the inlet system.

Offered up the new pedals and propped them in place to see how they would be position wise when I was in the driving seat. Seemed to work out OK, but unsure whether to use the original pedal mounting plate from the 2B kit, or to use flat plate to mount the brake/clutch pedal then work out an arrangement for the accelerator pedal. May do some mocking up using ply to start with.

I pressed the bushes into one of the pedals - quite a tight fit but the bench vice did its job. When I tried to put the pedal on the mounting tube discovered the tube was too large. Quick measure up showed the tube to be 14mm diameter, and have managed to borrow a drill of this size off a neighbour so hopefully this will solve the problem.

Pulled out the Mondeo engine loom to start pulling out the wiring/connectors I need for the injection. After battling with extremely sticky insulation tape, and trying to trace wires back when there are multiples of the same colour, I managed to get out most of what I need. Found one sensor that I can't identify though....need to check the Haynes manual for that.

Ordering fuel pump and swirl pot tonight, so may be able to start putting injection together in some form next weekend.

Sunday, 9 January 2011

Saved wiring to date

Just for the comedians amongst you, here is the saved wiring pile so far.....

The dismantling commences....

Well tonight I decided to get a few bits off and offer some of the new bits up.

This is the new brake kit:


Designed for a Robin Hood Zero, it turns the master cylinder around so it faces backwards, therefore giving space in the engine bay.

I started with the brake master cylinder. To lessen the amount of lost fluid, I sucked as much as I could out with a childs medicine syringe. Disconnected the brake pipes and the mounting bolts and the unit was out. One more bolt out of the pedal assembly strengthening bar....


....which is under the repair washer going back to the chassis, and the pedals were out.

Carbs were next.....blocked off the fuel line and released the carbs from the silicone hose mounts. Next was the manifold....had to work from the outside in with the mounting bolts as some muppet (that will be me then.....) welded the inlet tubes on without keeping the flange plate straight and warped it with all that heat on one side.

Once all the parts were off, could not resist offering up the injection manifold....


I also offered up the new pedal assembly mount


Immediate problems that raised their heads....

  • Manifold is wide and high.....quick check with spirit level and measuring tape suggests we will have about 15mm clearance to bonnet. Hopefully.
  • Manifold is close to original pedal box mount, meaning the pedals will have to be moved back, which is good news because....
  • The new pedals look like they will be further away from the seat, so mount needs moving back.
  • Mounting holes on master cylinder do not match new mount, but can probably be sorted by drilling/filing.....

What am I trying to do?

Well we are on the road to injection.... Got assistance from a friend the other night to get the bonnet off, gives a chance for the dog to see the rabbit, so to speak.

A quick reminder of why/what I am doing.....

This birds nest of wiring was supposed to be a temporary job when I was in a rush to finish the Zetec installation. Its now been like that for nearly two years....can't be too bad though...has done 3000 miles like this!


In addition I want to replace the carbs with fuel injection


Note the use of Diet Coke cans.....this was an attempt to lengthen the inlet tract to cure the fuel stand off problem.


Its all a bit tight between the brake master cylinder and the carbs...note how the brake line goes through the inlet tract of the carb.....

Sunday, 2 January 2011

Here we go again....

Well, its off the road for the injection swap over.

I have swapped the alternator for one off an Escort - the Mondeo one had outputs designed to go via the ECU, which meant the battery light was on regardless of which output wire I connected it to. The Escort alternator just has a straight forward main charging wire and a signal wire, so when I have recharged the battery and fired it up we will find out if it works as expected!

Go the pedal kit out of its box where it has been hiding for 18 months. Its designed for the Robin Hood Zero and mounts the master cylinder inwards towards the steering wheel, rather than into the engine bay. But looking at pics on the net it has a additional strengthening web which mine does not have, but will not be a problem to knock one up.